The following guide is intended for first-time LiveChat users. Plunge in, set up your LiveChat in a jiffy and be ready to communicate with your website visitors from the get-go.
Accessing the LiveChat application
If you don’t have an account yet, you’ll have to create one before going any further. There’s a 14-day trial available for free.
If your company has a LiveChat account already, there’s no need to create your own one. Instead, contact your manager. They’ll create an account for you. When they do, you’ll receive an invitation email.
There are two main ways of accessing LiveChat.
You can log in to LiveChat using your browser. The address to the app is: accounts.livechat.com. Bookmark it or even set it up as your homepage so you always have LiveChat at hand.
LiveChat offers native desktop apps for Windows and Mac. Alternatively, you can use one of our mobile apps for iOS and Android to chat with customers on the go.
Onboarding
When you log in to the LiveChat Agent app, you’ll be greeted by three onboarding pages. They display the initial steps to setting up your LiveChat account.
You’ll be presented with the following action items:
- Install LiveChat to make it work!
- Connect with your customers on Facebook
- Invite people to your team
These steps are there to help you cover the essential LiveChat setup: installing the chat on your website, connecting to social media and inviting teammates. They are a helping hand that will guide you through the first steps with our app. You’ll be up and running with LiveChat in no time!
If you don’t want to go through the setup right away, you can select the “I’ll do it later” button located at the bottom of each page.
Installation
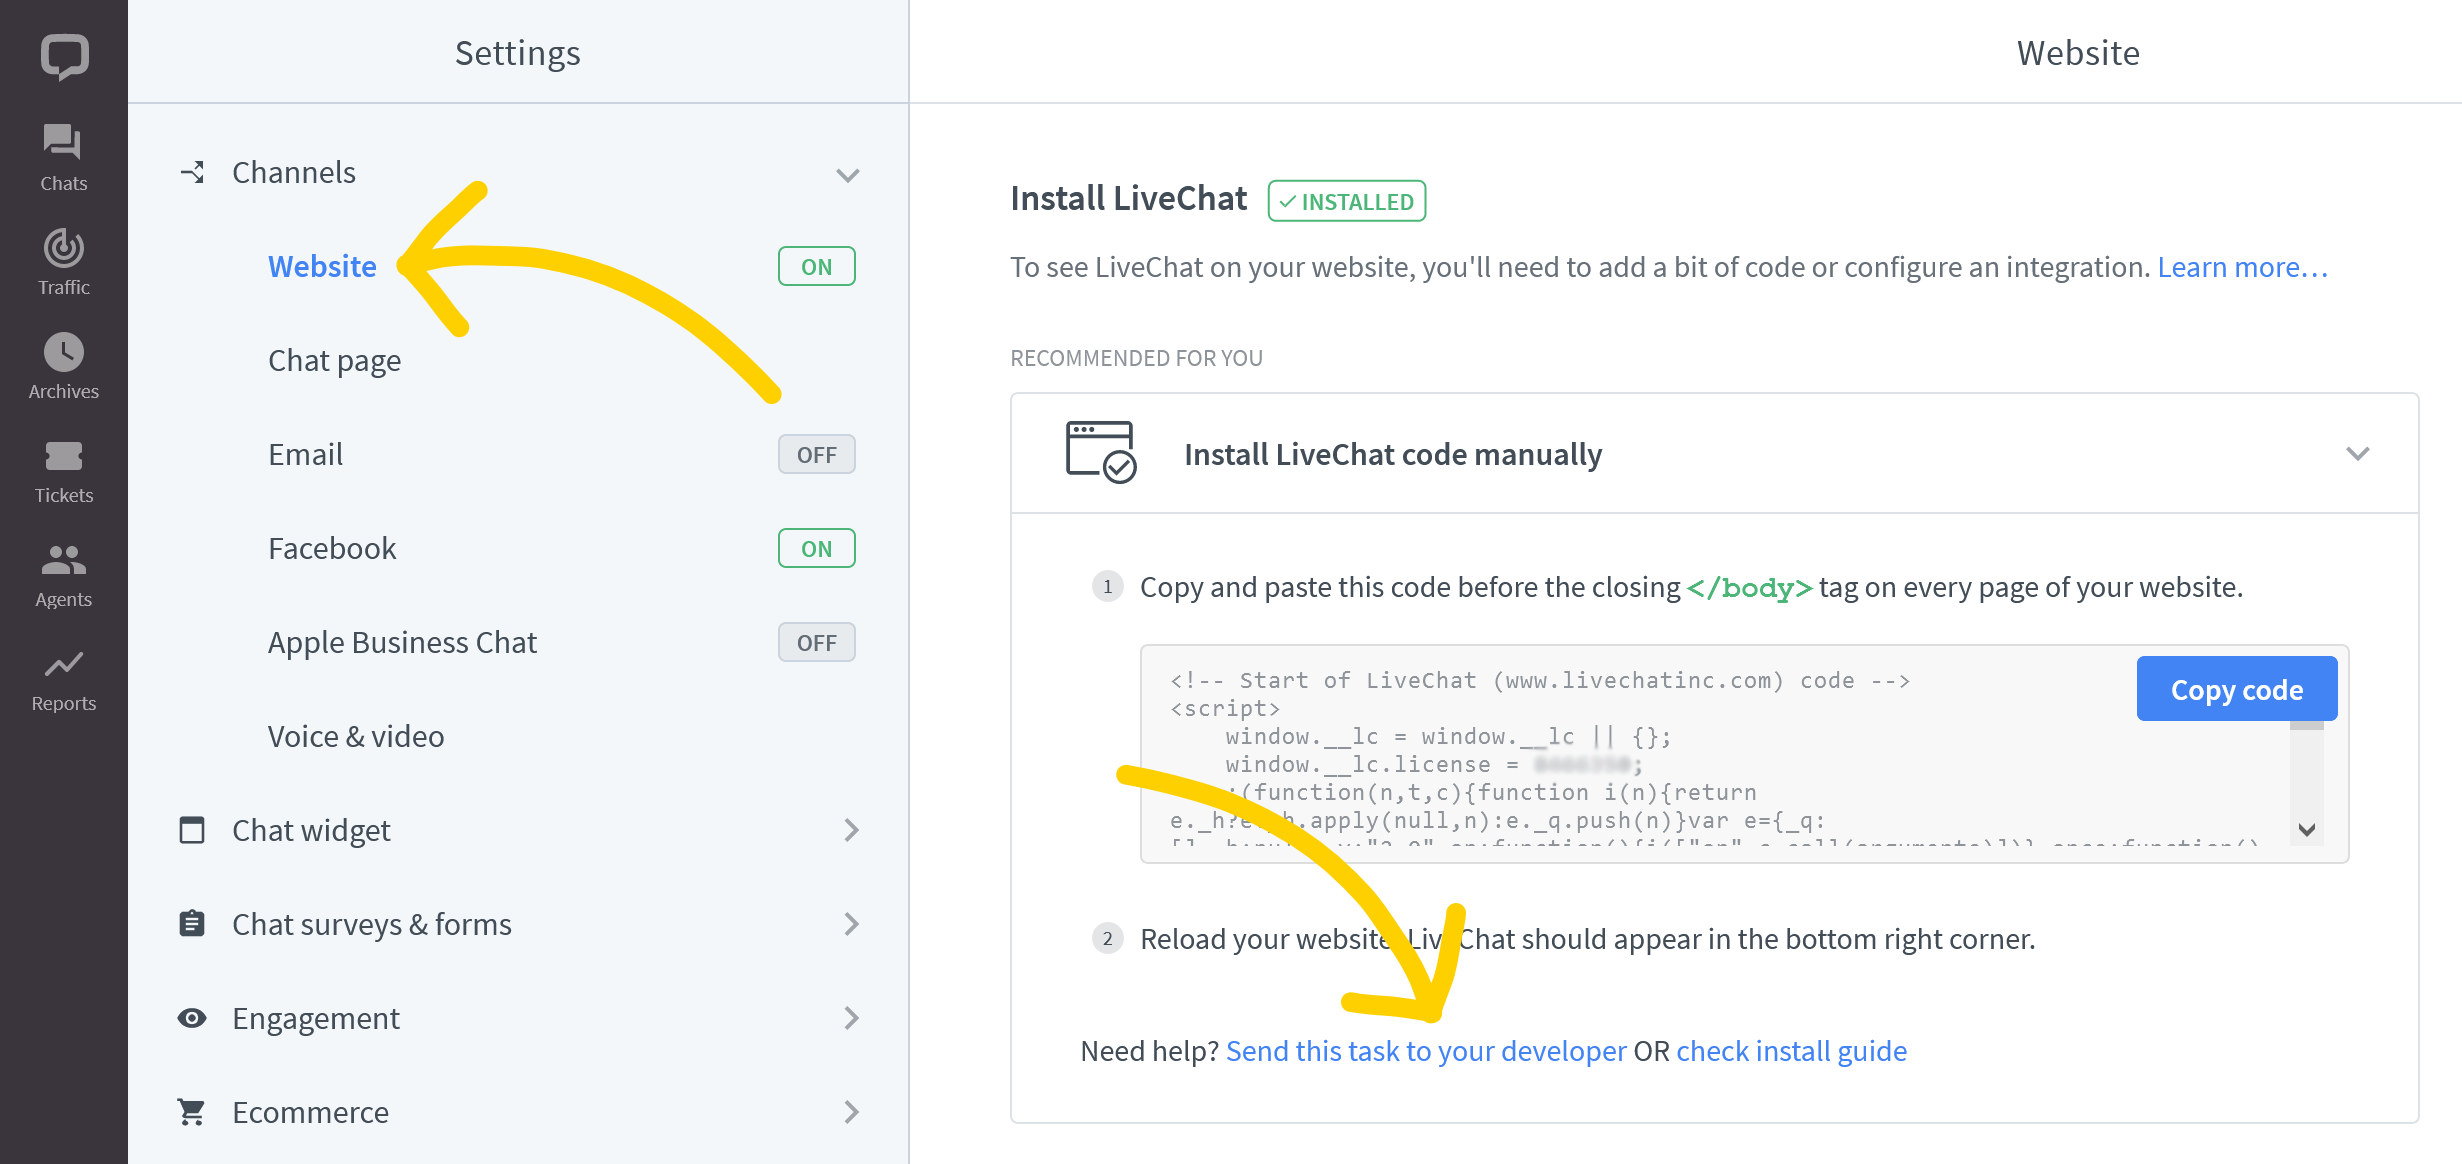
The LiveChat installation is based on JavaScript code. To install the chat manually, copy the ready-to-use code from Settings>Channels>Website in the LiveChat Agent app and paste it into your website’s HTML files, right before the </body> tag.
If you host your website on a web builder platform, for example WordPress or Shopify, we have free plugins for them over at our Marketplace, along with installation tutorials.
If you’re not a techy person, send the code to your web developer straight from the app:
Accepting Chats
You can start accepting chats as soon as you log in to the LiveChat Agent app. This means that customers who enter the chat on your website will get assigned to you automatically. This is great for a team that is ready to engage with customers. However, if you want to focus on other tasks in the app, you can switch off the “accepting chats” status.
The app has a built-in switch that lets you control your availability.
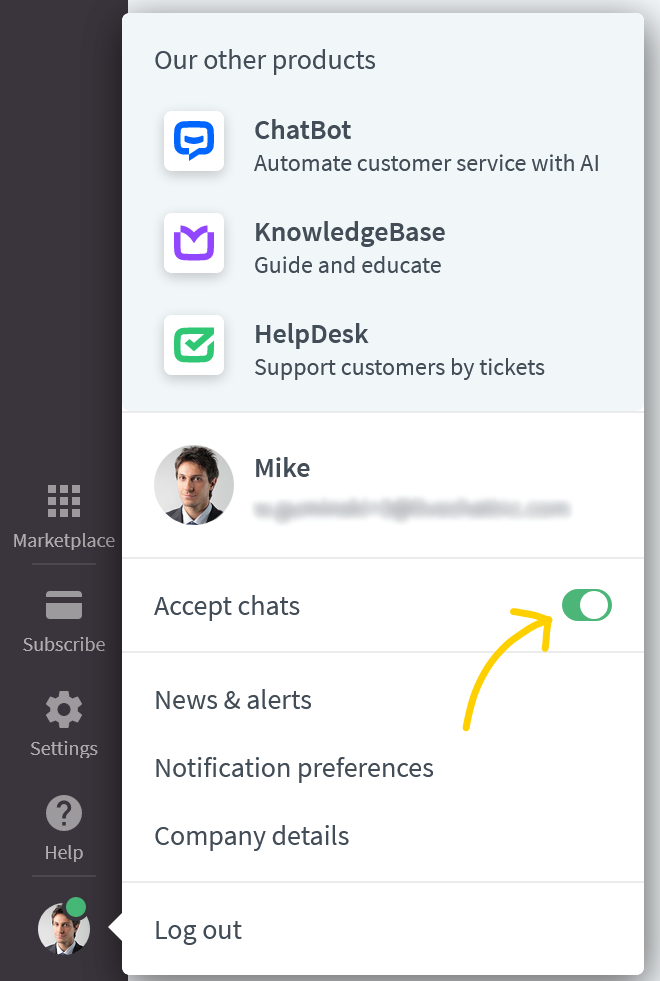
On the desktop application, you can find it by following these steps:
- Select the profile button in the bottom left corner. It will expand a panel showing the profile settings.
- Select the toggle next to Accept chats to switch the status on/off:
And in the mobile app you can find it by following these steps:
- Select the profile button in the bottom right corner of the app
- You’ll find the Accept chats toggle at the top of this panel:
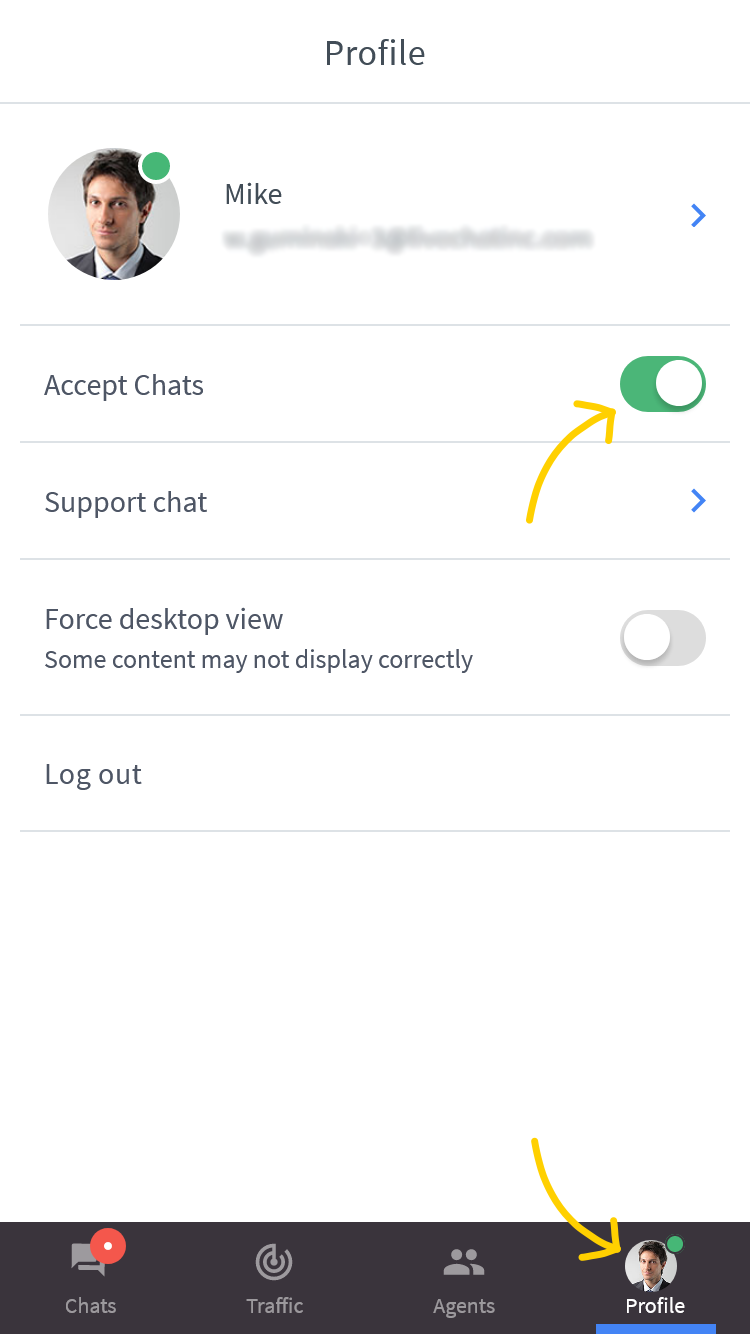
Select this toggle to switch it off and prevent chats from being assigned to you automatically. Use this option for situations like when you’re taking a break, managing your LiveChat account or when you simply need to stop the flow of incoming chats.
You can learn more about accepting chats in our dedicated guide.
Notifications
One of the most important features of live chatting is notifications. They alert you about new events happening in your chats. For a beginner, the most important notifications are:
- New visitor:
The new visitor notification will trigger anytime a new visitor enters your website. Such visitors are simply browsing your website and are not engaged in a chat.
- Incoming chat:
The incoming chat notification will let you know about any new chat the customer starts. It indicates that a fresh conversation has just been started and a visitor requires your attention.
- New messages:
The new messages notification will trigger whenever a visitor sends you a message in an ongoing chat.
To change your notifications settings, select the profile button and select Notification preferences:
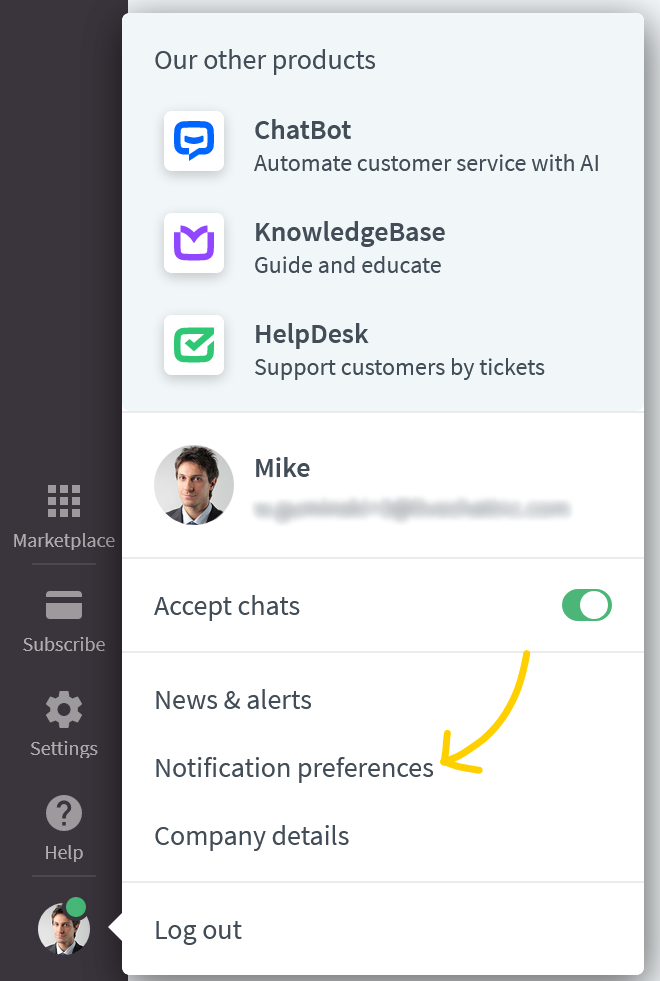
There you can modify any of the available notifications. Learn more about notifications in our dedicated guide.
Dark mode
The LiveChat application comes equipped with a neat feature called Dark Mode. It swaps the standard color scheme of the Home, Chats and Traffic sections from light to dark, which makes it much more comfortable for your eyes.
Turn on the modification to lessen the eye strain caused by prolonged screen time, reduce the blue light exposure, and get more comfortable, especially during night shifts.
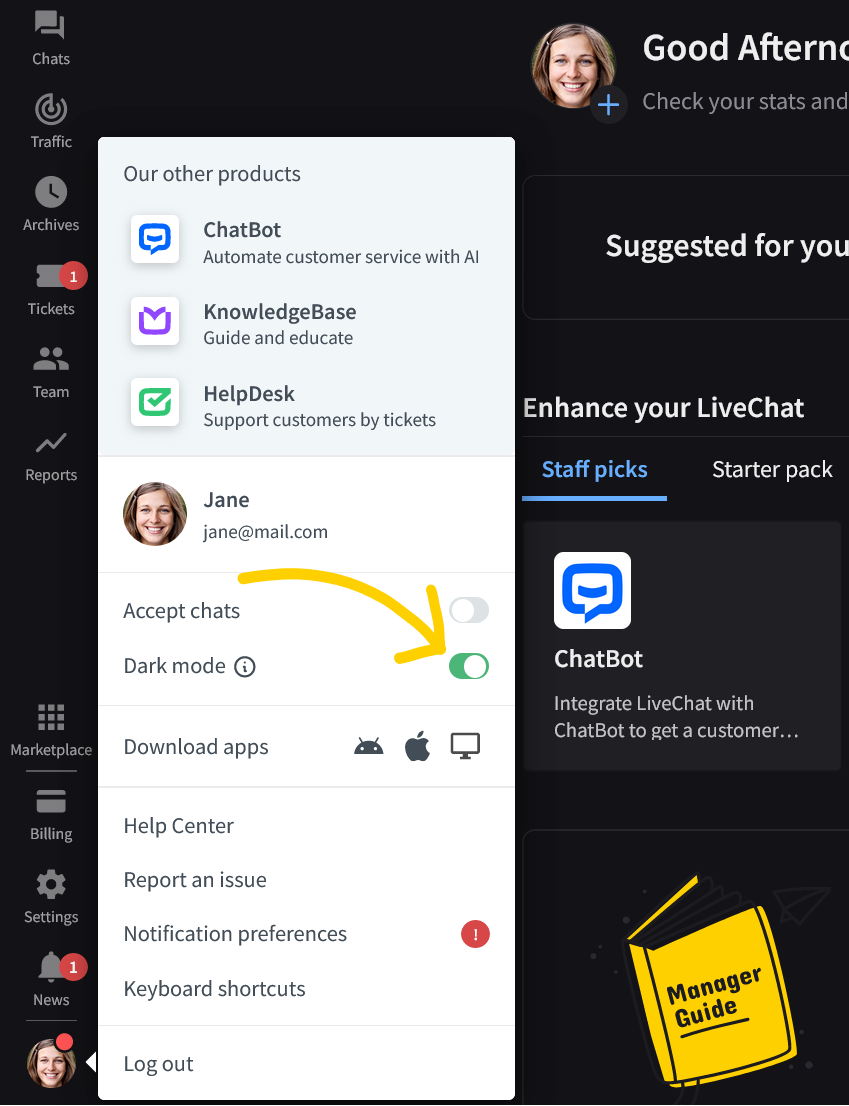
To set the dark tones:
- Select your profile picture at the bottom-left corner of the app
- Toggle Dark mode
Offline hours
Offline hours are times when you’re not available to chat (you’re either logged out of the LiveChat application or your Accept chats status is off).
During offline hours, your chat window will turn into an offline form which allows your website visitors to submit tickets. Tickets are equivalent to emails and are stored in the LiveChat application tickets section, on the left menu bar.
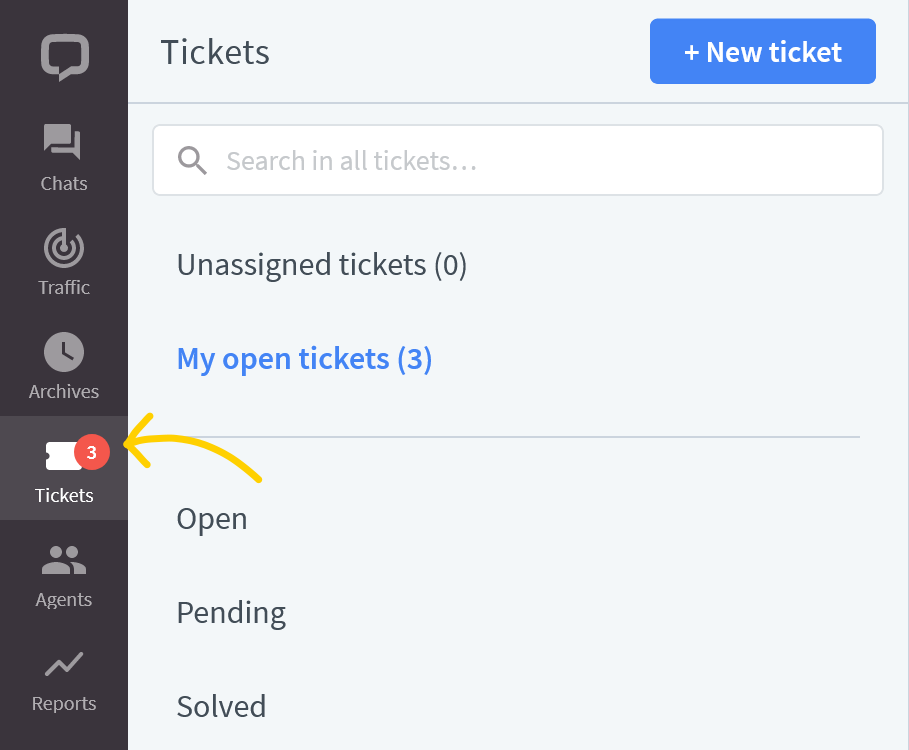
Whenever a visitor submits a ticket, you will be notified about it via email. The Tickets section tab will display a red badge with a number showing how many tickets await your attention:
If you have invited teammates to your LiveChat account, as long as any one of them is accepting chats, the chat widget will remain online on your website
Key parts of the LiveChat application
At the start of your LiveChat journey you will mostly focus on setting up communication channels. Here you’ll find a list of sections in the Agent app that will help you start communicating with customers right away:
- Chats:
The Chats section is your bread and butter. Any time a visitor starts a chat, it shows up in this section. This is where you communicate with visitors, check the survey information they filled in and find any other details our tracking system picked up.
We recommend checking this guide before accepting your first chats.
- Tickets:
The Tickets section is where you manage your offline communication. It stores tickets submitted by website visitors during offline hours. You can send replies, set statuses and assign tickets to your teammates through this section.
Check out our step by step guide on how to use the Tickets section.
- Archives:
The Archives section stores all the finished conversations. This section is especially useful if you need to check any information visitors may have left in chats. For example, data like their email address, name or their order. The chat transcripts are available for you in the Archives section at any time.
To learn more, check out this guide to Archives.
These are the tools of your trade. Get comfortable with them and see how seamless the communication can be!
The journey
LiveChat comes with a default setup that has been designed to fit most business use cases. For example, the chat window will automatically invite visitors toon your website to chat, covering the engagement for you. You can focus on communication itself.
Your LiveChat journey has just begun and you’ve learned the ropes. The default setup will cover your needs. But if you feel ready to dig into the possibilities the LiveChat Agent app provides, check out the following topics:
- Agent’s handbook – Comprehensive manual for agents
- Chat widget customization – Customization guide for the Chat Widget
- Campaigns – Automated engagements and eye catchers
- Traffic section overview – Your website traffic sneak peek
- Reports section overview – A description of analytics available in LiveChat
- Chat assignment – Chat routing that suits your needs
- Canned responses – A solution to repetitive topics
- Tags – A way to sort your visitors’ queries
- ChatBot – Chat automation with a virtual assistant
- HelpDesk – A customizable ticketing system with collaboration tools and automated workflow
- Marketplace – A market full of useful integrations and apps
- HelpCenter – A great source of knowledge. If you have a query regarding LiveChat software, you will find the answer here

